
How to Setup Machine Layout for Basic Woven Shirt in Garments Industry
The shirt has become one of the most common and popular items of menswear, though women also do not lag behind in making use of them. There are varieties of shirt design. Some are formal and basic white; others are casual types and may incorporate unique design features. Shirts have become the most popular outer wear in the hot & humid countries. Cold countries find them as common apparel worn under a coat or jacket. It should be noted here that dress shirts are shirts that enable the use of a necktie. Here, I am presenting how to set up a Machine Layout for a Basic Woven Shirt in the Garments Industry.
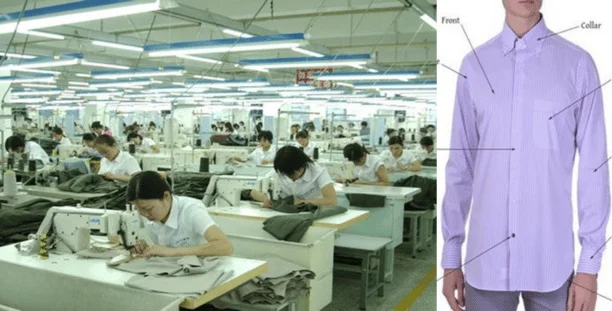
Different Parts of a Basic Shirt:
Basic shirts comprise the following major parts:
- Collar (One piece collar, Two piece bounded collar, Multi piece collar etc.),
- Cuffs (Squared, rounded, pointed, notched, etc.
- Two full sleeves,
- Left front with one pocket and buttonhole stand (Top center of front placket),
- Right front incorporating button stand,
- Yoke (One piece single yoke, two piece double yoke, etc.
- Back part,
- Armhole,
- Bottom hem,
- Sleeve placket,
- Label.
Woven Shirt Sewing Production Line Machine Layout in the Apparel Industry:
The basic woven shirt is very common in the garments industry. Machine layout plan is always a key factor for higher production. If the total plan is executed perfectly, then it will be easy for the production team to meet the shipment date without any hassle. As its importance, this article has presented a well-tested Setup Machine Layout for Basic Woven shirts, formal shirts, casual shirts, or basic shirts.
Setup Machine Layout for Basic Woven Shirt in Garments Industry:
We will make calculations for the body and collar-cuffs-sleeves separately @150pc per hour. Body process operations are shown here. Processes are allocated to operators so as to make a layout for body processes. All the major parts are prepared separately & later assembled together to form a shirt. The process flow diagram of apparel breakdown and their assembly is shown in below:
Machine Layout Plan for Shirt Body:
| SL No. | Name of Operations | Machine Required | Standard Time | Operator Allocation |
| 01 | Attach top center to left front | 4-ndl double chain stitch machine | 24” | Operator-1 |
| 02 | Hem pocket mouth | 1-ndl lock stitch with thread trimmer | 12” | Operator-2,3 |
| 03 | Fold pocket | Manual | 42” | Operator-4,5 |
| 04 | Attach pocket | 1-ndl lock stitch with thread trimmer | 40” | Operator-2,3 |
| 05 | Hem right front button stand | 1-ndl lock stitch with hemmer folder | 24” | Operator-6 |
| 06 | Cut & fold label | Label cutting & folding machine | 3” | Operator-7 |
| 07 | Attach label to under yoke | 1-ndl lock stitch with thread trimmer | 16” | Operator-7 |
| 08 | Back yoke attach sewing | 1-ndl lock stitch with thread trimmer | 24” | Operator-8 |
| 09 | Back yoke top stitch | 1-ndl lock stitch with thread trimmer | 19” | Operator-9 |
| 10 | Shoulder join | 1-ndl lock stitch with thread trimmer | 46” | Operator-10, 11 |
| 11 | Top stitch on shoulder join | 1-ndl lock stitch with thread trimmer | 24” | Operator-12 |
| 12 | Attach sleeves | 2-ndl 5-thread safety stitcher | 48” | Operator-13, 14 |
| 13 | Side seam | 2-ndl feed of the arm machine | 46” | Operator-15, 16 |
| 14 | Collar attach sew | 1-ndl lock stitch with thread trimmer | 40” | Operator-17, 18 |
| 15 | Collar attach stitch | 1-ndl lock stitch with thread trimmer | 40” | Operator-19, 20 |
| 16 | Hem body bottom | 1-ndl lock stitch with thread trimmer with hemmer foot | 24” | Operator-21 |
| 17 | Attach cuffs | 1-ndl lock stitch with cuff folder | 48” | Operator-22, 23 |
| 18 | Button sewing | Button sewing machine | 38” | Operator-24, 25 |
| 19 | Buttonhole sewing | Buttonhole sewing machine | 36” | Operator-26, 27 |
| Total standard time for body processes | 594” | |||
Average Process Time Calculation Method:
Average process time,
= (594/19)
= 31.26”
Calculation of BPT, UCL, LCL, Organization Efficiency & Production Target Per Hour:
Production target per hour with 27 operators,
= {(27×3600×0.85)/594}
= 139pcs per hour
Again,
Bottleneck time= 26 second,
So,
Production per hour,
= (3600/26)
= 138pcs per hour.
Now,
Basic pitch time (BPT) is,
= (594/27)
= 22”
Again,
Upper control limit (UCL) is,
= (22”/0.85)
= 25.88”
Again,
Lower control limit (LCL) is,
= {2 × (BPT-UCL)}
= (44-25.88”)
= 18.12”
Now,
Organization efficiency is,
= (BPT/Bottleneck time)
= {(22”/26”) × 100}
= 84.66%
Again,
Direct productivity is,
= (138/27)
= 5.11 pcs per operator per hour
Machine Lay Out Plan for Shirt Collar, Cuffs, and Sleeves:
| SL No. | Name of Operations | Machine Required | Standard Time | Operator Allocation |
| Collar Processes | ||||
| Fp-1 | Fuse interlining | Fusing press | 6” | Operator-Fp-1 |
| Clr-2 | Sew collar | 1-ndl lock stitch with Sewing thread trimmer | 24” | Operator-1 |
| Clr-3 | Cut collar tip & turn | Manual | 22” | Operator-2 |
| Clr-4 | Form collar | Collar forming machine | 20” | Operator-3 |
| Clr-5 | Press collar | Manual | 20” | Operator-4 |
| Clr-6 | Top stitch collar | 1-ndl lock stitch with thread trimmer | 16” | Operator-5 |
| Clr-7 | Sew collar bottom | 1-ndl lock stitch with thread trimmer | 8” | Operator-5 |
| Clr-8 | Trim collar bottom | Collar contour trimmer | 6” | Operator-6 |
| Fp-1 | Fuse interlining to band | Fusing press | 6” | Operator-Fp-1 |
| Clr-9 | Feel or roll band | 1-ndl lock stitch with thread trimmer | 18” | Operator-6 |
| Clr-10 | Collar band attach sewing | 1-ndl lock stitch with thread trimmer | 24” | Operator-7 |
| Clr-11 | Turn band | Manual | 10” | Operator-8 |
| Clr-12 | Collar band attach stitch | 1-ndl lock stitch with thread trimmer | 18” | Operator-9 |
| Clr-13 | Cut band bottom | Over lock machine | 6v | Operator-9 |
| Clr-14 | Mark 3-point on collar | Manual | 12” | Operator-8 |
| Cuff Processes | ||||
| Fp-1 | Fuse interlining | Fusing press | 12” | Operator-Fp-1 |
| Cf-2 | Fell or roll cuff | 1-ndl lock stitch with thread trimmer | 18” | Operator-10, 11 |
| Cf-3 | Sew or run stitch cuffs | 1-ndl lock stitch with thread trimmer | 30” | Operator-10, 11 |
| Cf-4 | Fold inside | Iron or vacuum board | 8” | Operator-12 |
| Cf-5 | Turn cuffs | Manual or iron | 12” | Operator-12 |
| Cf-6 | Form cuffs | Cuff forming machine | 24” | Operator-13 |
| Cf-7 | Top stitch cuffs | 1-ndl lock stitch with thread trimmer | 18” | Operator-14 |
| Cf-8 | Cuff pair match | Manual | 6” | Operator-15 |
| Sleeve Processes | ||||
| Slv-1 | Sew under placket to sleeve | 1-ndl lock stitch with thread trimmer | 18” | Operator-15 |
| Slv-2 | Fold upper placket | Manual | 24” | Operator-16 |
| Slv-3 | Attach sleeve placket | 1-ndl lock stitch with thread trimmer | 36” | Operator-17, 18 |
| Total standard time for collar, cuff & sleeves | 422” | |||
Average Process Time Calculation Method:
Average process time,
= (422/24)
= 17.58”
Calculation of BPT, UCL, LCL, Organization Efficiency & Production Target Per Hour:
Production target per hour with 19 operators,
= {(19×3600×0.85)/422}
= 143pcs per hour
Again,
Bottleneck time= 24 seconds,
So,
Production per hour is,
= (3600/24)
= 150pcs per hour
Now,
Basic pitch time (BPT) is,
= (422/19)
= 22.21”
Again,
Upper control limit (UCL) is,
= (22.21”/0.85)
= 26.13”
Again,
Lower control limit (LCL) is,
= {2 × (BPT-UCL)}
= (44.42-26.13”)
= 18.29”
Now,
Organization efficiency is,
= (BPT/Bottleneck time)
= {(22.21”/24”) × 100}
= 97.66%
Again,
Direct productivity is,
= (150/18)
= 8.33 pcs per operator per hour.