
Different Types of Hand Stitches with Pictures
Hand stitching is stitching by hand of human instead of a sewing machine. So the stitching precision will not be like a sewing machine. There are different types of hand stitches. Some common Different Types of Hand Stitches with Pictures are discussed in this article.
Running or straight stitch is the most common of all. You may experience that at least once in your whole lifetime. While you tear your dress, unfortunately, and don’t have enough time to have it fixed by a professional, you may fix it by yourself if you have a little knowledge about it.
Different Types of Hand Stitches are discussed below
There are several types of hand stitches. But all of them are familiar with the sewers. So, the most common types of hand stitches are discussed in this article.
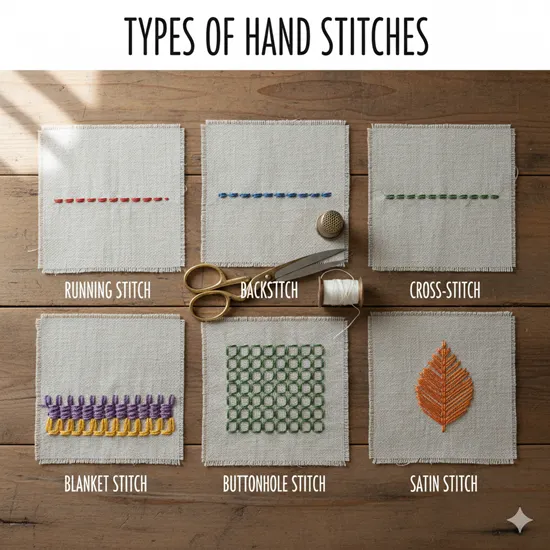
1. Straight or Running stitch
This is the most basic type of hand stitch.
Procedure:
- According to the design, insert the needle down to the fabric.
- Bring the needle up from the below of the fabric.
- Then stick it down again.
- Repeat the process until the thread is run out.
- Leave space between the strands of threads.
Used for:
- Intricate stitches
- Fine gathering
- Hand darning
- Easy tucking
2. Backstitch
It is a strong and reliable stitch. When the sewing machines are not introduced, clothes are made by layer upon layer of backstitches. This form is also known as backstitch, back stitch, outline stitch, stem stitch, and split stitch.
Procedure:
- Take a small stitch
- At the end of the former stitch, insert the needle and bring it out where the thread emerges.
- Carry on the step.
- Mind it, always insert the needle at the end of the former stich.
Used for:
- Holding the fabric pieces together tightly
- Handmade garments in the place of machine stitching
- Putting a zipper by hand
- Delicate garments under-stitching
3. Basting or tacking stitch
Basting stitch is such a stitch that can replace pins. Basting stitch is also known as tacking stitch. It is not more than a running stitch. But the only difference is that it has a longer spaces and longer strands of threads. Easy process with just a slight changes in the space and length.
Procedure:
- According to the design, insert the needle down to the fabric with longer stitches up to 1/4 inch to 1/2 inch.
- Bring the needle up from the below of the fabric.
- Then stick it down again.
- Repeat the process until the thread is run out.
- Pull the fabric back a bit when the stitch is done.
Used For:
- Temporary stitch
- Gathering fabric
- Tucking
4. Catch stitch
It is perfect of hemming especially when it is applied for light or soft fabrics.
Procedure:
- Begin the stitch from the wrong side of the flap just to hide the knot under the cloth.
- Grab just a millimeter distance of the fabric diagonally from the original spot where the needle is stuck through.
- Then the needle is inserted down to catch the small amount of flap fabric.
Used For:
- Hemming
- Tacking
- Holding interfacing pieces to-gather
5. Blanket stitch or Buttonhole stitch
Procedure:
- Secure the thread and bring the thread to the outside edge.
- Insert the needle through the fabric 1/8 inch from the edge.
- Then wrap the thread under the needle.
- Pull the needle through and form a knot.
- Covering hooks and eyes, bring the needle to the surface.
- Bring the knot to the fabric edge.
- Make sure the stitches are very close to-gather.
Used for:
- To cover hooks and eyes
- Sew on fastener
- For hand worked buttonhole
6. Fell stitch
Procedure:
- Emerging on the folded edge, make a stitch about 1mm away from the fold.
- Pierce the needle to the fabric nest to the fold
- Diagonally run it to emerge the stitch with the first stitch
- Close the stitch.
Used For:
- Applique seam
7. Whip stitch
Procedure:
- Whip stitch is simple stitch in both crocheting and sewing
- First enter the needle to the inside of the top lip to hide the knot inside
- Then the needle goes through the bottom and top lip.
- Keep the thread over the lip.
- Repeat the steps.
Used for:
- Making applique
- Making jeans
- Quilting
- Hemming
8. Overcast stitch
The overcast stitch is near and almost similar to the whip stitch and is used to keep fabric edges neat and prevent them from fraying. It provides a clean, safe finish for raw edges. For a very smooth finish, you can use the double overcast stitch. This involves crossing the diagonal stitches as you go, which forms a series of small ‘X’ shapes along the edge.
9. Ladder Stitch (Slip Stitch / Blind Hem Stitch)
This versatile stitch, known interchangeably as the Ladder Stitch, Slip Stitch, or Blind Hem Stitch, is a hand-sewn technique used specifically for creating invisible hems.
To Sum Up!
Hope you will have a little knowledge of these stitches. This will help you to create or decorate your own clothes. These are the Different Types of Hand Stitches with Pictures would help you learn comprehensive details on hand stitches.
- You may love to read: Difference Between Lock Stitch Machine & Chain Stitch machine