What is seam puckering?#
Seam puckering is a wavy or gathered appearance of the fabric along a seam. Instead of lying flat, the fabric forms small ripples on one or both sides of the stitch line. It can appear straight after sewing, or only after pressing or washing.
Puckering is one of the most common appearance complaints on shirts, blouses, lightweight wovens and fine knits. It is usually a major defect because it makes the garment look poorly made, and it rarely presses out permanently.
What it looks like#
- A regular ripple pattern along the seam, often on the side of the lighter or more flexible ply.
- A seam that is shorter than the panel edges beside it.
- Puckers that open up when you stretch the seam lightly, then return.
- Puckering that is worse after washing, especially on seams with polyester thread on cotton fabric or with fused interlining.
Where it occurs#
- Long straight seams on lightweight wovens: side seams, sleeve seams, yokes, plackets.
- Topstitching on collars, cuffs and pockets.
- Dense fabrics sewn along the warp, such as fine poplins and microfiber.
- Knits where the fabric stretches during sewing, such as neckline and armhole seams.
- After finishing, when garment washing or pressing shrinks one component more than another.
Likely causes#
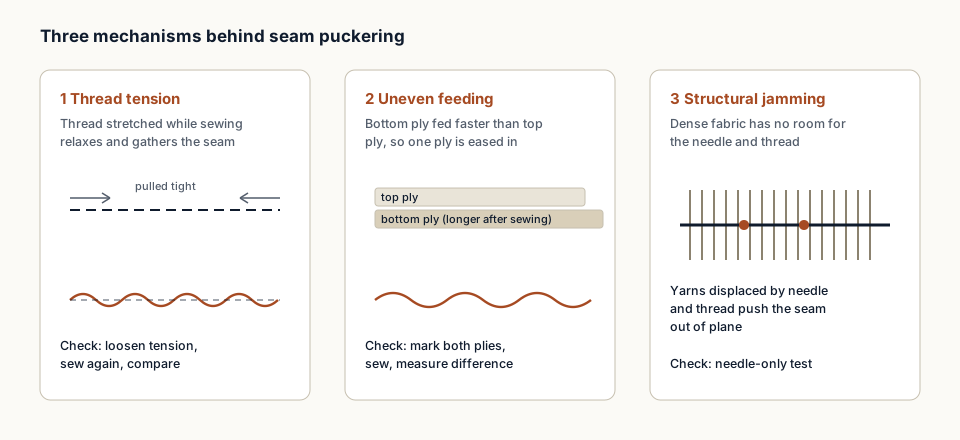
Puckering almost always comes from one of four mechanisms:
- Tension puckering. The thread is stretched during sewing. When it relaxes, it pulls the seam shorter.
- Feeding puckering. The top and bottom plies are fed by different amounts, so one ply is eased into the other.
- Structural jamming. In a dense fabric, the needle and thread push yarns aside. With no space to move, the fabric buckles.
- Shrinkage puckering. Thread, fabric, lining or interlining shrink by different amounts in washing or pressing.
The sections below list the specific causes under each group. The quick checks in how to confirm the cause tell you which mechanism you are dealing with.
Machine-related causes#
- Thread tension too high. The most common cause. Needle thread and bobbin (or looper) tension should be as low as possible while still forming a balanced stitch.
- Presser foot pressure too high drags the top ply; too low lets the fabric flag and slip.
- Feed dog set too high, worn, or with teeth that are too coarse for the fabric.
- Needle too thick, blunt or with the wrong point. A thick needle displaces more yarns in dense fabric.
- Throat plate hole too large, letting the fabric push down into the plate.
- Machine speed very high on delicate fabric, which increases needle heat and thread stretch.
Material-related causes#
- Fabric density. Tightly woven fabrics with fine yarns leave no room for the stitch.
- Thread size and type. A thick thread in a fine fabric jams; a highly elastic thread stretches and recovers.
- Thread shrinkage. Some threads shrink more than the fabric in washing or steam pressing.
- Different shrinkage between components. Fused interlining, pocketing or lining that shrinks differently from the shell.
- Bias or stretchy cuts that extend during handling.
Operator and process-related causes#
- Pulling the fabric behind the needle or pushing it in front stretches one ply.
- Plies not aligned at the start of the seam, so the operator eases in the difference at the end.
- Inconsistent handling between operators on the same operation.
- Wrong process order, for example topstitching before the panel is stabilised.
Method-related causes#
- Stitch density too high. More stitches mean more needle penetrations and more thread in the seam.
- Seam type or stitch class not suited to the fabric. A single-needle lockstitch is prone to puckering on some lightweight fabrics where a chainstitch or a different seam construction performs better.
- No feeding help where it is needed: differential feed, walking foot, needle feed or a puller.
- Seam direction. On very dense fabrics, a seam exactly on the warp puckers more than one slightly off-grain.
Environment-related causes#
- Pressing with too much heat or steam for the thread or interlining.
- Humidity changes between cutting and sewing can affect some fabrics' dimensions.
How to confirm the cause#
Work through these checks on a test strip of the production fabric:
- Tension check. Sew a seam, then cut a few stitches and let the thread relax. If the pucker eases, tension is involved. Reduce tension step by step until the stitch is just balanced.
- Feeding check. Mark both plies every 10 cm before sewing. After sewing, measure the marks. If the plies differ in length, the problem is feeding.
- Needle-only test. Sew the fabric with the needle unthreaded. If the fabric still ripples, the fabric is jamming around the needle: this is structural puckering.
- Wash test. Wash a seam sample. If puckering appears or worsens only after washing, compare the shrinkage of the thread and each component.
- Operator comparison. Have a second operator sew the same seam on the same machine. If the result changes, handling is a factor.
Immediate containment#
- Stop the operation and hold the current bundle.
- Check the last few bundles from that operator and machine; separate puckered pieces.
- Decide with the quality team whether puckered seams can be repaired (unpicked and resewn) without damaging the fabric. Needle holes often remain visible on dense fabrics.
- Inform end-of-line checkers to inspect this seam on every piece until the fix is confirmed.
Corrective action#
| Confirmed cause | Corrective action |
|---|---|
| Tension | Reduce needle and bobbin tension; use a thread with lower elongation |
| Feeding | Adjust presser foot pressure; use differential feed, walking foot or a puller |
| Structural jamming | Finer needle, finer thread, lower SPI, sew slightly off-grain |
| Thread shrinkage | Change to a thread with lower shrinkage for this fabric and finish |
| Component shrinkage | Match interlining and lining shrinkage to the shell; pre-shrink components |
| Operator handling | Retrain on guiding the fabric without pulling |
After each change, sew and wash a test seam before restarting bulk.
Preventive action#
- Set up a sewing trial for new fabrics that includes the needle-only test and a wash test.
- Record the approved needle, thread, SPI and tension for each style in the operation bulletin.
- Include shrinkage testing of every component (shell, lining, interlining, pocketing) before bulk.
- Keep machines maintained: feed dogs, presser feet and throat plates in good condition.
- Train operators on fabric handling for difficult fabrics.
Inspection notes#
- Inspect seams laid flat under good light, and again after the finishing process.
- Compare with the approved sample; some light textures are acceptable on specific fabrics if agreed.
- Many buyer quality manuals class visible puckering on the front of the garment as major. Follow your buyer's classification.
- Record puckering by operation, so the source is clear in the DHU report.
Factory checklist#
- Needle size, point and system match the fabric
- Thread type and size approved for the fabric and finish
- Stitch density set to specification
- Needle and bobbin tension at the minimum for a balanced stitch
- Presser foot pressure checked on the production fabric
- Feed dog height and condition checked
- Differential feed or walking foot used where the trial showed it is needed
- Component shrinkage tested and matched
- Operators briefed on guiding without pulling
- Test seam washed and approved before bulk
For thread and needle choices in detail, see sewing thread selection and sewing needle selection.