Before cotton can be dyed evenly, it must be cleaned. Raw (greige) cotton carries natural waxes, pectins, proteins and minerals in the outer layer of each fiber, plus oils and dirt picked up in spinning and knitting. These impurities make the fiber water-repellent, so dye cannot penetrate evenly. Removing them is called scouring.
For decades, scouring meant boiling cotton in strong caustic soda. Bio-scouring does the same job with enzymes at moderate temperature and mild pH. It uses less energy and water, produces a milder effluent and is gentler on the fiber. This guide explains how it works and how to run it in a dyehouse.
What scouring has to remove#
The cotton fiber is almost entirely cellulose, but its outer layers (the cuticle and primary wall) contain non-cellulosic material:
| Impurity | Where it comes from | Why it matters |
|---|---|---|
| Waxes | Natural, on the fiber surface | Make cotton hydrophobic; cause uneven dyeing |
| Pectins | Natural, bind waxes to the fiber | Hold the wax layer in place |
| Proteins | Natural, inside the fiber | Can cause yellowing, affect absorbency |
| Minerals | Natural and from water | Affect dye and chemical performance |
| Spinning and knitting oils | Added in processing | Cause spots and uneven dyeing if left |
| Seed coat fragments (motes) | Ginning residues | Dark specks; not removed by enzymes |
The goal is an evenly absorbent fabric, so that dyes and chemicals reach every fiber at the same rate.
Conventional scouring#
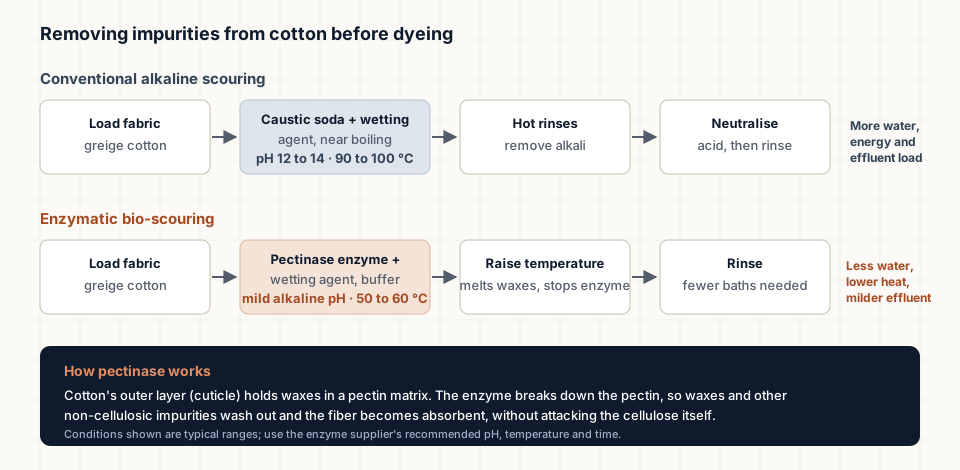
In conventional scouring, cotton is treated with caustic soda (sodium hydroxide), wetting agents and detergents near the boil. The alkali saponifies waxes and breaks down pectins and proteins. It works reliably, but it has costs:
- High temperature means high steam and energy use.
- Strong alkali must be rinsed out and neutralised with acid, which needs more water and time.
- The effluent is strongly alkaline with a high load of dissolved solids.
- The harsh conditions attack the fiber surface, causing weight loss and a harsher hand.
How bio-scouring works#
Bio-scouring uses pectinase enzymes, usually alkaline pectate lyases, which break down the pectin in the cotton's outer layer. Once the pectin that anchors the waxes is broken, the waxes and other impurities can be washed out with a surfactant, especially when the bath is heated after the enzyme stage.
Enzymes are selective. A pectinase attacks pectin, not cellulose, so the fiber itself is not damaged. That selectivity is the reason for most of the benefits.
Typical process conditions#
The values below are typical ranges for commercial alkaline pectinase products. Every enzyme product has its own optimum, so always follow the supplier's technical data sheet.
| Parameter | Conventional scouring | Bio-scouring |
|---|---|---|
| Main chemical | Caustic soda | Pectinase enzyme |
| pH | Strongly alkaline (about 12 and above) | Mildly alkaline (about 8 to 9.5) |
| Temperature | Near boiling (about 90 to 100 °C) | Moderate (about 50 to 60 °C) |
| Time at temperature | 30 to 60 min | 15 to 60 min |
| After-treatment | Hot rinses, acid neutralisation | Temperature rise to remove waxes and deactivate enzyme, rinse |
| Effect on fiber | Some attack, weight loss | Minimal attack |
Step-by-step bio-scouring process (exhaust dyeing machine)#
This is a typical sequence for cotton knits in a jet or soft-flow machine. Adjust it to the enzyme supplier's recommendations and your machine.
- Load and fill. Load the fabric and fill with water at the set liquor ratio. Soft water gives more consistent results.
- Add auxiliaries. Add a wetting agent or detergent suited to enzymes, and a sequestering agent if water hardness is high.
- Set the pH. Adjust to the enzyme's working range with a buffer (for example soda ash in small amounts), and check with a pH meter.
- Heat to the enzyme temperature (for example 55 °C) and add the pectinase.
- Run the enzyme stage for the set time (for example 20 to 30 minutes), keeping temperature and pH stable.
- Raise the temperature (commonly to 80 to 95 °C for a short time) with the surfactant present, to melt and emulsify waxes and to deactivate the enzyme.
- Drain and rinse hot, then warm.
- Continue to bleaching (for whites and pastels) or directly to dyeing (for many medium and dark shades), as the recipe requires.
Working out the liquor ratio and checking chemical dosing is covered in Dyeing Liquor Ratio Calculation and Dosing Checks on the companion site Apparel Diary.
Testing the result#
| Test | How it is done | What it tells you |
|---|---|---|
| Drop absorbency | Time for a water drop to be absorbed into the fabric (AATCC TM79 describes the method) | Quick check of absorbency |
| Wicking height | Height water climbs up a fabric strip in a set time | Uniformity of absorbency |
| Weight loss | Weigh conditioned fabric before and after scouring | How much material was removed; fiber damage |
| Dyeing trial | Dye a sample with a sensitive shade | Levelness and color yield |
| Whiteness (if bleached) | Whiteness index with a spectrophotometer | Effect on bleaching results |
Compare bio-scoured and conventionally scoured samples side by side before changing the bulk process. Absorbency should be even across the width and along the length of the fabric.
Benefits#
- Lower temperature: less steam and energy per batch.
- Fewer rinses and no neutralisation: less water and shorter process time.
- Milder effluent: lower alkalinity and dissolved solids load, which is easier for the effluent treatment plant.
- Gentler on cotton: less weight loss and strength loss, and a softer hand.
- Better fabric quality: less fiber damage can mean fewer surface problems later; many mills pair bio-scouring with enzymatic bio-polishing, which reduces surface fuzz and improves pilling performance.
- Chemical management: replacing strong caustic in scouring supports programs such as ZDHC and helps with restricted substances control, as long as all auxiliaries used are compliant.
The size of the savings depends on the machine, the fabric, the previous process and how the recipe is optimised. Measure water, steam and time per kilogram of fabric before and after the change, instead of relying on general figures.
Limitations#
| Limitation | What to do |
|---|---|
| Does not remove seed coat fragments or natural color | Bleach with hydrogen peroxide for whites and pastels |
| Sensitive to pH, temperature and water quality | Control the bath closely; use soft water |
| Heavily contaminated fabric (oils, waxes from knitting) | Use a suitable detergent; consider a pre-wash |
| Enzyme cost | Offset against savings in energy, water and time; optimise dosage |
| Different results on different cottons | Trial each new cotton or fabric quality |
Bio-scouring is not a cure for poor raw material. Immature cotton and neps show as specks after dyeing regardless of the scouring method; see fabric defects and neps.
Enzymes across cotton wet processing#
Bio-scouring is one of several enzyme steps that dyehouses use:
| Enzyme | Process | Purpose |
|---|---|---|
| Amylase | Desizing (wovens) | Removes starch size from warp yarns |
| Pectinase | Bio-scouring | Removes pectin and releases waxes |
| Catalase | After peroxide bleaching | Destroys residual hydrogen peroxide before dyeing |
| Cellulase | Bio-polishing, denim washing | Removes surface fuzz, gives a clean surface or a worn look |
Switching from conventional scouring: a practical plan#
- Trial in the lab with the enzyme supplier, on your fabrics and water.
- Run bulk trials on a few batches of your most common qualities.
- Compare absorbency, weight loss, dyeing levelness, shade, and color fastness to washing against the conventional process.
- Measure water, steam, time and chemical cost per kilogram.
- Write the standard operating procedure: dosages, pH checks, temperature profile, sampling points.
- Train operators and set pH and temperature alarms on machines where possible.
- Review results monthly and adjust.
Where bio-scouring fits in knit processing#
For cotton knits such as single jersey, a typical route is: greige fabric, bio-scouring (with or without bleaching), dyeing, soaping and washing off, softening, drying and compacting. Good pretreatment also reduces later problems with shade variation and uneven dyeing. The different knit structures that pass through this route are described in different types of knit fabrics.
Frequently asked questions#
Is bio-scouring suitable for all cotton fabrics? It works on most cotton and cotton-rich knits and wovens. Heavily contaminated fabrics may need an extra detergent wash.
Can bio-scouring replace bleaching? No. It removes waxes and pectins but not natural color or seed coat fragments. Whites and pastel shades still need bleaching; many dark shades can be dyed after bio-scouring alone.
Does bio-scouring affect color fastness? Scouring itself does not set fastness; dye selection, fixation and washing off do. Even absorbency from good scouring helps level dyeing.
How do I know the enzyme is working? Check absorbency and weight loss on every trial, and monitor pH and temperature in the bath. Loss of absorbency often points to a pH or temperature problem.