A fabric shrinkage test, properly called a dimensional stability test, measures how much a fabric shrinks or grows in length and width after washing and drying. The result is a percentage for each direction. It is one of the most frequently specified tests in apparel, because shrinkage decides whether a garment still fits after the first wash.
This guide explains how the test works, how to calculate and report the result, and how to use it in production. The exact procedure always comes from the test method your buyer names.
What the test tells you#
| Result | Meaning | Typical cause |
|---|---|---|
| Negative length change | Fabric got shorter | Fabric was stretched lengthways in processing and relaxed in washing |
| Negative width change | Fabric got narrower | Fabric was pulled wide on the stenter |
| Positive change (growth) | Fabric got longer or wider | Some knits and loose structures, often in width |
| Large difference between directions | Unbalanced stability | Uneven finishing, knit structure |
Shrinkage is not a fault in itself. Most cotton fabrics shrink a little. The question is whether it is within the limit the buyer sets for that product and test procedure.
Test methods in use#
| Method family | Used for | Main documents |
|---|---|---|
| ISO | Fabrics and garments, most international buyers | ISO 6330 (washing and drying procedures), ISO 3759 (marking and measuring), ISO 5077 (calculation of dimensional change) |
| AATCC | Mainly North American buyers | AATCC TM135 (fabrics), AATCC TM150 (garments) |
| Buyer methods | Some retailers | The buyer's test manual, usually based on the above |
ISO 6330 defines a set of washing procedures (named by temperature and wash action, for example a 40 °C normal program) and drying procedures, identified by letters in the standard, such as line drying, flat drying and tumble drying. The buyer's requirement tells you which program and which drying procedure to use, and how many wash cycles. A result is only meaningful together with the procedure that produced it.
Step-by-step procedure#
The principle is the same in every method. Specimen size and benchmark distances vary by method; the values below are those commonly used, and you should always check the current edition of the method you follow.
1. Take the specimen#
- Cut the specimen from bulk fabric from the actual finishing batch, not from a lab dip or sample yardage.
- Take it at least 10 cm in from the selvedge and away from creases, joins and faults.
- A common specimen size for ISO testing is 500 mm × 500 mm. AATCC TM135 uses a smaller specimen.
- Mark the length direction (warp for wovens, wale for knits) on the specimen.
2. Condition#
Leave the specimen flat, without tension, in a standard atmosphere for the time the method requires. Cotton, viscose and other cellulosic fibers change dimensions with humidity, so measuring an unconditioned specimen gives a false result.
3. Mark benchmarks#
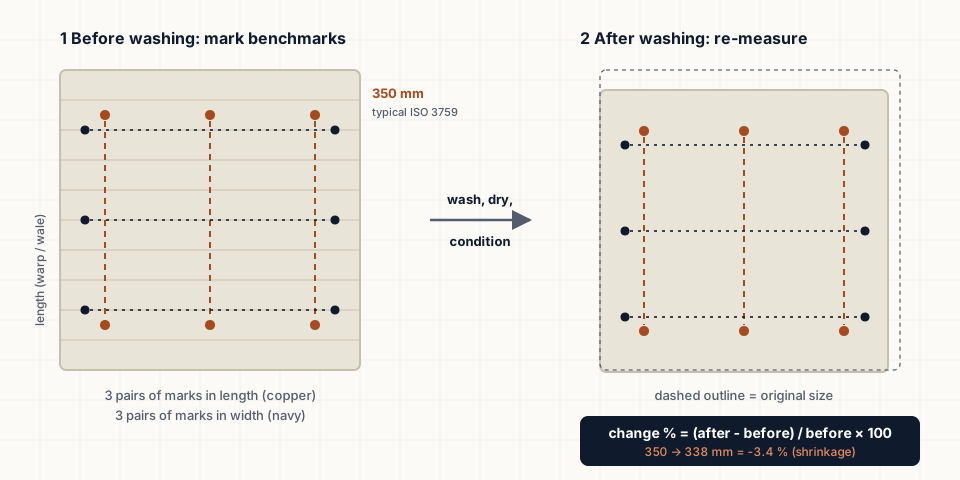
- Mark three pairs of reference marks in the length direction and three in the width direction.
- For ISO 3759, the marks are commonly 350 mm apart, and at least 50 mm from the edges.
- Use fine indelible ink, or sew small thread marks on fabrics where ink bleeds.
4. Measure before washing#
Lay the specimen flat on a smooth table, without stretching it, and measure each benchmark distance to the nearest millimeter. Record all six readings.
5. Wash and dry#
- Wash in the specified machine type with the specified program, detergent, load (made up to the correct weight with ballast fabric) and number of cycles.
- Dry by the specified procedure. Line, flat and tumble drying can give very different results on the same fabric.
6. Condition and measure again#
Condition the specimen again in the standard atmosphere, then measure the same six distances.
7. Calculate#
Calculate each pair, then average the three results for each direction. Negative values are shrinkage and positive values are growth.
Worked example#
A 500 mm × 500 mm cotton single jersey specimen is marked with 350 mm benchmarks and washed and tumble dried to the buyer's procedure.
| Pair | Before (mm) | After (mm) | Change |
|---|---|---|---|
| Length 1 | 350 | 338 | -3.43% |
| Length 2 | 350 | 337 | -3.71% |
| Length 3 | 350 | 339 | -3.14% |
| Length average | -3.4% | ||
| Width 1 | 350 | 346 | -1.14% |
| Width 2 | 350 | 345 | -1.43% |
| Width 3 | 350 | 346 | -1.14% |
| Width average | -1.2% |
If the buyer's limit for this product and procedure were plus or minus 5% in both directions, the fabric would pass. If the limit were minus 3% in length, it would fail, and the fabric would need to be reprocessed or the pattern adjusted. The shrinkage calculator does this arithmetic and also gives the compensated cutting length.
Garment test#
A garment dimensional stability test measures agreed points on the finished garment (such as body length, chest, sleeve length and waist) before and after washing, usually to AATCC TM150 or an ISO procedure applied to garments. It shows how the fabric, seams, interlinings and trims behave together.
| Fabric test | Garment test | |
|---|---|---|
| Specimen | Cut square of fabric | Finished garment |
| Measured | Benchmark distances | Garment points of measure |
| Shows | Fabric behaviour | Fabric plus seams, interlinings, trims and construction |
| Used for | Fabric approval, pattern compensation | Final product approval, fit after washing |
A fabric that passes can still produce a garment that fails, for example when a fused interlining shrinks differently from the shell fabric, or when seams restrict shrinkage in one direction and cause puckering.
In-house quick check versus laboratory test#
Many factories run a quick in-house test on every fabric roll or lot before cutting, and send samples to an accredited laboratory for buyer approval.
| In-house check | Accredited laboratory | |
|---|---|---|
| Purpose | Early warning, lot acceptance, pattern compensation | Official result for buyer approval |
| Equipment | Domestic or industrial machine, tape, table | Reference washing machine, conditioning room, calibrated equipment |
| Frequency | Every lot or roll group | As required by the buyer's test program |
| Risk | Results can differ from the lab if the procedure differs | Slower and costs more |
Keep the in-house procedure as close as possible to the buyer's method, and compare your in-house results with laboratory results regularly. Record results on a sheet such as the fabric shrinkage test sheet.
Reading a test report#
Check that the report states:
- The method and the wash and dry procedure (program, temperature, drying method, number of cycles).
- The result for each direction, not only an average.
- Whether the result is for the fabric or the garment.
- For knitted fabrics, whether spirality was measured after washing too. See fabric spirality.
- The sample identity: fabric quality, color, lot or roll number.
What to do when shrinkage is too high#
- Confirm the test: repeat with the correct procedure on correctly conditioned specimens.
- Test more rolls to see whether the whole lot or only some rolls are affected.
- Ask the mill to reprocess: relaxation, compaction for knits or sanforising for wovens, and finishing at the correct width.
- For garment-washed products, adjust the pattern with a shrinkage allowance based on tests of the actual wash process.
- Record the finishing parameters of good lots so they can be repeated.
The causes and controls are covered in fabric shrinkage and the excessive shrinkage defect guide.
Common mistakes#
- Comparing results from different procedures. A tumble-dried result and a line-dried result are different tests.
- Measuring before conditioning.
- Stretching the specimen while measuring.
- Averaging length and width into one figure.
- Testing lab dips or samples instead of bulk fabric from the finishing batch.
- Ignoring spirality and twist, which appear in the same wash test for knits.
Related guides#
- ISO, ASTM and AATCC test methods: dimensional change methods by standard.
- Fabric testing standards and methods: shrinkage within the full test program.
- Single jersey fabric: the knit fabric most often tested for shrinkage.
- Moisture control management SOP for garments: why specimens must be conditioned before measuring.
Frequently asked questions#
Is shrinkage the same as dimensional stability? Dimensional stability is the property; shrinkage (or growth) is the measured change. A fabric with good dimensional stability shows little change.
How many wash cycles should be tested? As many as the buyer's method specifies. Some programs require one cycle; others require three or five, because some fabrics keep shrinking over several washes.
Why test garments as well as fabric? Sewing, seams and trims can restrict or add to shrinkage, so a garment can behave differently from the fabric it was cut from.
Can I use a 100 cm² GSM cutter specimen for shrinkage? No. It is far too small to measure a few percent change accurately. Use the specimen size and benchmark distance of the method.